|
<< Prev
[1]
[2]
[3]
Next >>
 |
Step 1
Select the desired rendering settings in the Control, Options, Settings, and
Tracing tab pages of the Renderer dialog. Press one of the the Render buttons
on the right of the Renderer dialog to start rendering.
By default the Scanline (Software) renderer is used to produce the images.
Various levels of Ray tracing can be enabled in the Tracing tab page.
Phong rendering is suggested in most cases since ray tracing is notoriously memory and time intensive.
If your hardware can support it the GPU Render button will be un-grayed and you can use it.
The software renderer is multi-threaded and will benefit greatly if
additional processors/cores are installed in the system. Rendering
on a two processor system will almost be twice as fast as with one processor.
|
 |
Step 2
The GPU renderer uses the same control settings as the scanline renderer
Because this renderer relies on the graphics adapter's processor hardware
it is important to appreciate that some limitations apply to this renderer.
Only the first 8 lights are used.
No spotlight shadows are available.
No light distance attenuation applies.
Not all image post-processors or plug-textures are available.
Ray tracing is disabled.
This renderer works much faster than the software renderer - up to 32 times as fast. When rendering some animations it will work almost in real-time at large frame sizes and high settings of anti-aliasing. It works most efficiently when rendering ansimations because all the models and image files are only loaded once at the start of the sequence and do not have to be loaded at every frame. When just rendering a single frame all the modes and images in use for that frame have to be loaded.
|
 |
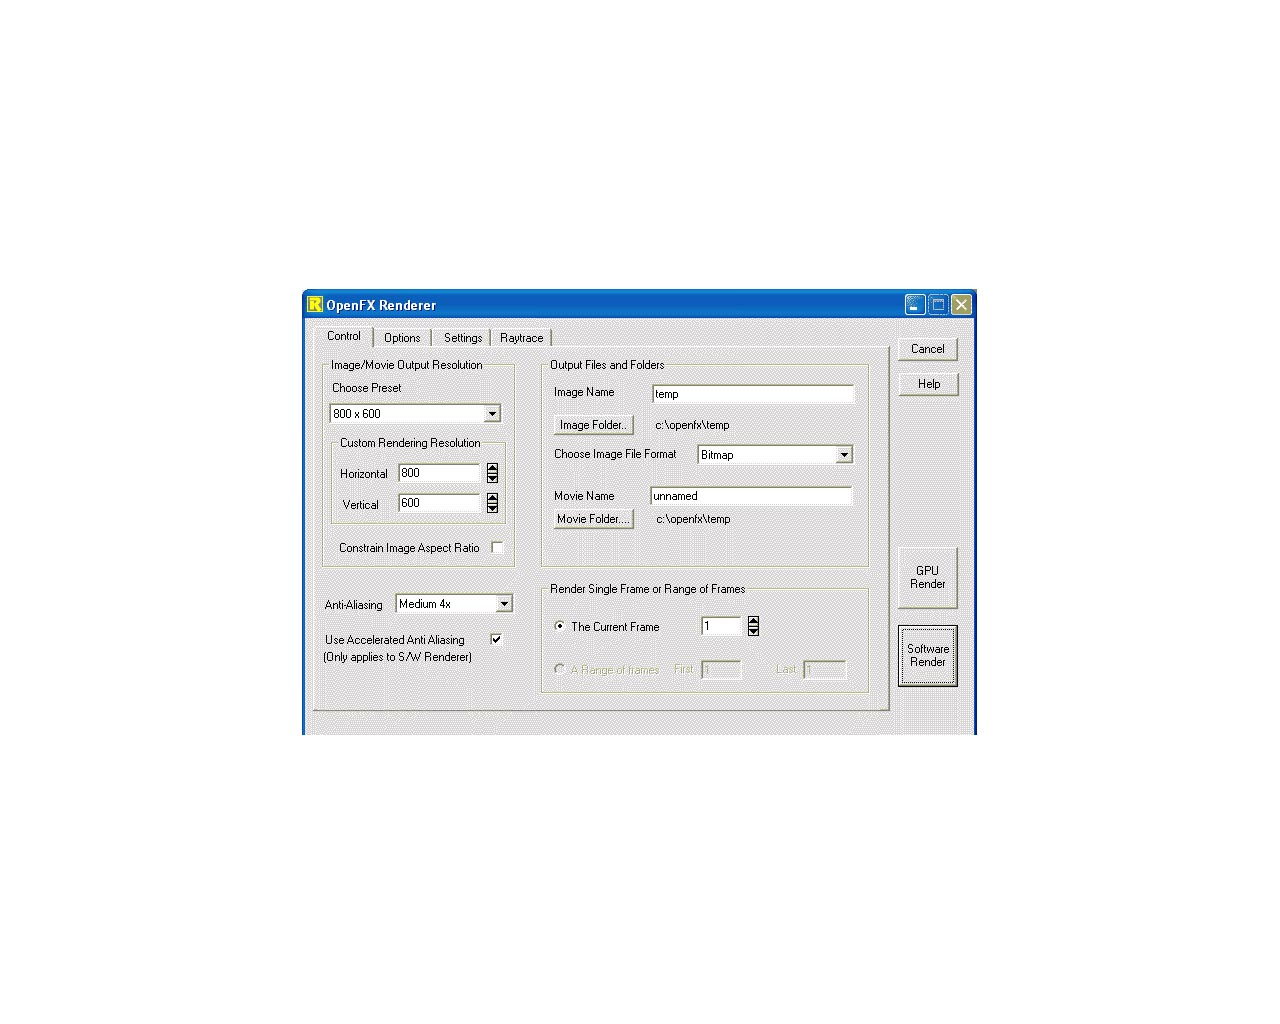
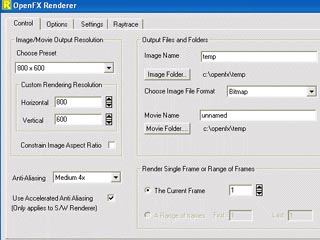
Step 3: Renderer Control Tab Page
The Control page of the Renderer offers the most significant control parameters.
The most important buttons are on the right and control whether the scanline software
renderer is used or the harware rendering engine(GPU rendering) is used. The hardware
rendering engine will be much faster for most images and movies (up to 30 times faster)
but it will not work on older hardware and some graphics cards may not be compatible.
(You must have a graphics adapter that supports at lease OpenGL 2.0)
Resolution - Choose the resolution to which the image is rendered. Choose one of the presets or enter the number of horizontal and/or vertical pixels in the edit controls. The number of pixels in the image is horizontal resolution multiplied by the vertical resolution. The higher the resolution the longer it takes and the more memory it needs to render the image.
Anti-Aliasing - Choose the level of anti-aliasing. In low resolution modes the appearance of an image can be improved if it is anti-aliased. Basically, anti-aliasing smoothes out some of the 'jaggies' that are visible at the edges of colored regions in the image. Anti-Aliasing is very time consuming: it will take a little under 4 times as long to render a Good anti-aliased image than an image with no anti-aliasing. Using Best level of anti-aliasing, the image will take approximately 9 times longer to render than a non anti-aliased one.
Accelerated Anti-Aliasing - Accelerate the anti-aliasing process, with small quality reduction. Normally anti-aliasing an image increase the rendering time quite significantly, up to 9 or 10 times for a setting of Best. The main effect of anti-aliasing is seen near the edges of models or where faces with different colors join. Pixels in the interior of faces benefit very little from anti-aliasing. When this option is selected, anti-aliasing is applied near the edges of faces and not in the center. For most models this is as good as full anti-aliasing and it can be up to 3 times faster. Images with models that have image maps or shaders, where there is quite a bit of detail in the interior of faces, will not benefit as much from having their anti-aliasing accelerated.
Image Format - Select the file format into which the image or images will be stored. This automatically determines the color resolution in the image. For an single image or multiple still images the GIF format uses an 8 bit palette, while the TGA and TIF formats are either High-Color or True-Color (16 bit or 24 bit).
Image Name - Name the image and the directory to which it is to be rendered. The default image directory is "Render".
Movie Name - Name the animation and the directory to which it is to be rendered and compressed. The default animation directory is "Movies". Movies are written in the AVI fiel format and can be written using any installed codec or in an uncompressed format for high quality postprocessing.
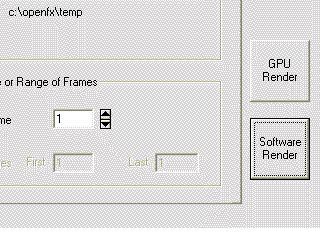
Current Frame - Specify which frame of an animation is to be rendered.
Range - Specify a range of frames to be rendered.
|
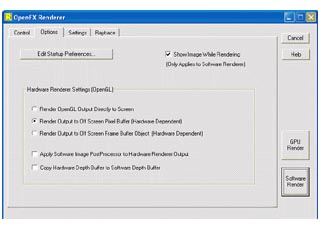 |
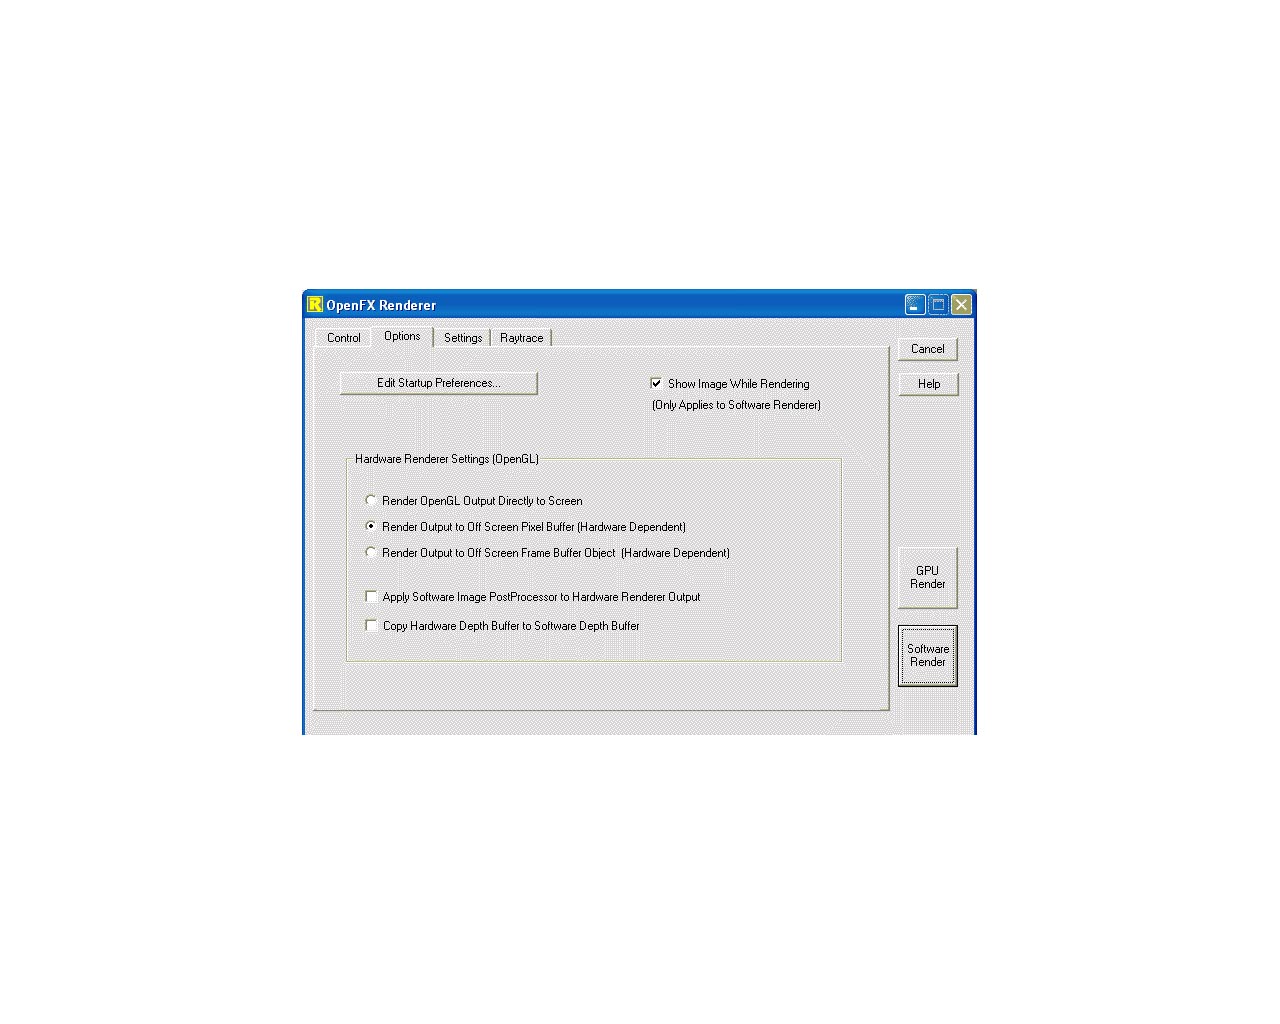
Step 4: Renderer Options Tab Page
The Options page of the Renderer offers additional control parameters.
Show Image While Rendering - Displays a preview image in the Rendering Status Window during the rendering.
Startup Preferences - Enables preference settings to override the defaults.
Hardware Renderer Settings - These apply to the GPU renderer:
Output directly to Screen - If you use this option you will be limited in the resolution of the output you can make to the sise of your desktop window. And it must draw on top of your desktop so you will not be able to continue working while renderiing.
Render to Pixel buffer (P-buffer) - This is the best option,
Render to Frame Buffer Object (FBO) - Render to offscreen buffer. This should be the fastest option - but it behaves differently on different adapter cards.
If you tick the Apply Software Post..... button then the images created by the OpenGL renderer will be passed to the software processor functions (external DLLs). This is useful since not all the postprocessors have been re-written for use with the OpenGL renderer.
If you tick the Copy Hardware Depth... button then the hardware depth buffer is copied to the software depth buffer and you can use depth dependent software post-processors (like fog).
|
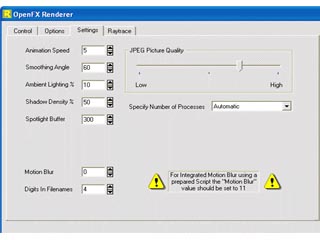 |
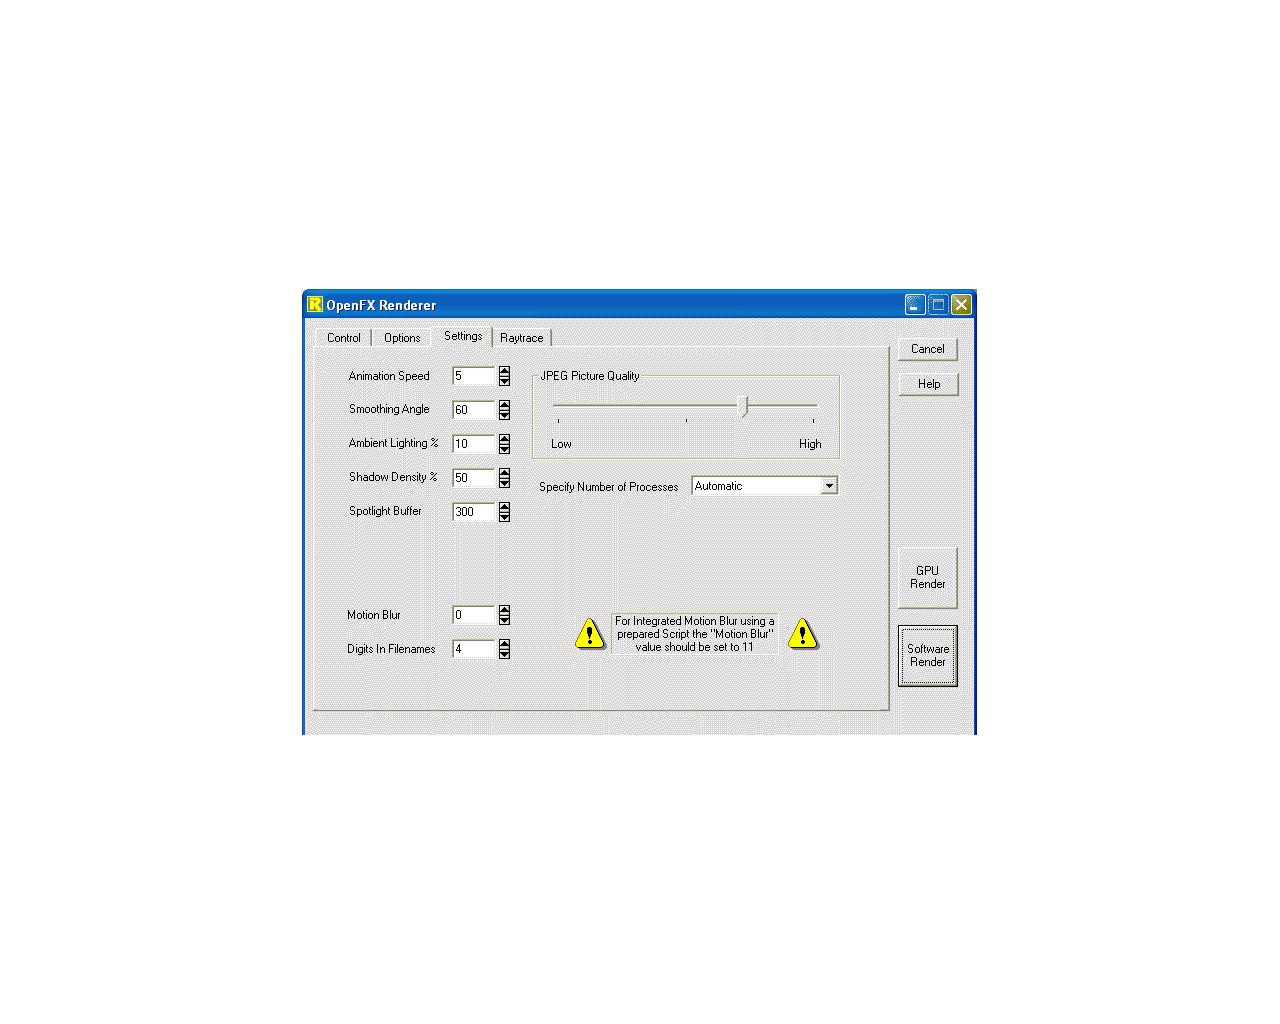
Step 5: Renderer Settings Tab Page
The Settings page of the renderer offers additional control parameters.
The Smoothing angle, ambient light, shadow density and spotlight buffer
size ONLY apply to the scanline software renderer.
Note: These settings only apply to the Software Renderer.
Animation Speed - Set the speed value built into the FLI/FLC files. The value is in jiffies, zero implies the animation will play as fast as possible.
Smoothing Angle - Set the maximum Phong smoothing angle. If the angle between any adjacent faces exceeds this value, the Phong smoothing is automatically turned off for those faces. This switch can help eliminate artefacts that sometimes appear in an image if the smoothing in a model has been set inappropriately.
Ambient Lighting % - Overrides the ambient light settings usually specified in the Sky Actor. A maximum of 30% works quite well, values greater than 70% produce images that have very little contrast.
Shadow Density % - Specify the darkness of shadows cast on the Ground. Set the density of the shadows. 50% is the default, 100% gives completely black shadows, 0% gives no shadows at all.
Spotlight Buffer - Alter the resolution of the shadows cast by spotlights. The shadows created by the spotlights require a block of memory. A setting of 320 reserves a block of memory of 256k for each spotlight. The size of the block dictates the smoothness of the shadow. A value of zero implies that a spotlight will not cast a shadow. You can calculate optimum settings for best results by multiplying the number of pixels by 4 (e.g. 320x200x4=256,000 bytes required).
Motion Blur - Higher values generate Motion Blur. The normal range is 0-10. When a number outside this range is entered the full integrated motion blur comes into play.
Digits in Filenames - Specify the number of leading zeros in a Rendered filename.
JPEG Picture Quality - Specify the JPEG compression quality. Higher quality creates larger file sizes.
|
Tutorial written by Stuart
<< Prev
[1]
[2]
[3]
Next >>
|